Showing posts with label veggies. Show all posts

Thursday, March 22, 2012

Container Gardening {a series} : Starting Seeds Outside


We've discussed getting started with container gardening and starting seeds inside.  What about those cool weather crops that you can sow directly outside?  You know, peas, spinach, carrots, etc...

1.  Make a plan.  Research and make sure you know when you are supposed to be planting seeds outside.  Reference the seed package and the Almanac website, which I referenced in previous posts.  How many seeds are you going to put per container?  Is each container big enough for the seeds you are planting?  I have found, for instance, my tomatoes do so much better with larger pots, one plant per container.

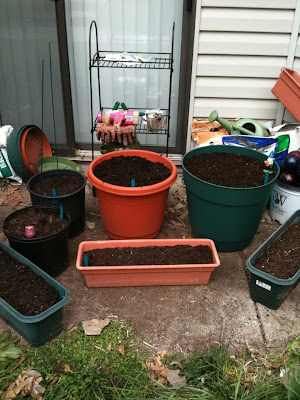
2.  Prepare your soil.  For me, I have pots left over from last year.  Most of them are still full of soil, and some are still full of dead plant parts.  I made sure I till and mix the soil completely in each pot, often removing any large leaves or plant parts.  This year, I mixed in some Cotton Burr compost for extra nutrients.  Maybe you are filling new pots.  Make sure you have chosen good potting soil and fill your pots.  A little compost on top can also be helpful.

3.  Plant your seeds.  When your soil is ready, gather your seeds.  Follow the directions on the seed package for soil depth and how far apart to plant seeds.  I know it is hard for me to sometimes only put one seed or plant per pot, but it is worth it.  When the plants have more space, they will produce better.

4.  Water your planted seeds.  Make sure to give your seeds a good drink to help them settle in their new home.

5.  Label and watch them grow!  I am (for the first time) labeling all my pots with what is growing in them.  I have several different varieties of peppers and tomatoes, and I need to know if I am picking a green pepper or a chocolate pepper.

What are you planting for cool weather crops this year?  I already have snow peas (above), carrots, spinach, clover, wildflowers, and broccoli growing outside.

Container Gardening {a series} : Getting Started


If you are like me, you may rent your apartment home and have a small-ish patio that is big enough to store a chair and a few pots.  Well, the past couple years I have tried my hand at container gardening with some success.

But are you wondering how to start?  Here are a few good tips to get you started.

1.  Make a plan.  How much space do you want to use for your containers?  How much sun does your space get each day?  Could there be a critter problem?  Think, think, think.  Envision how you think the containers will look on your patio - maybe even make a sketch.

2.  Decide what you are going to grow.  Not everything will grow in a container well (like corn).  Check out the book "Bountiful Container."  This book answered so many of my specific questions about planting in containers.  Also, check out the Almanac site to find planting dates and information specific to your area.  You can see my area here.  Do you want to grow herbs? Lettuces? Tomatoes? Peppers?  Root veggies?  Make your decisions and be realistic based on your needs and space.

3.  Make a plan.  Again.  Make a chart with due dates of when you need to plant and transplant seeds/plants.  I used my Orchestra app on my iPhone to create alerts to remind me.  Yes, I did.

4.  Go shopping!  After you have planned your space, decided on your produce selections and have completed a little research, I turn you loose on the wonderful world of shopping.  You list might include:
  • Potting soil
  • Compost
  • Fertilizer
  • Seeds or starter plants
  • seed starting soil
  • seed starting containers
  • Pots/containers
  • gardening tools (spade, gloves, watering can, water globes)
  • Planting markers (so you know what you plant)
Here's what I do.  I get potting soil and compost.  For some plants, I use the fertilizer Osmocote.  I try to start everything from seeds, whether they start outdoors (spinach, carrots, peas, beans) or they are started indoors (peppers, broccoli, tomatoes, squash, melons).  I get my seeds from Sustainable Seed Company because they have organic, heirloom (save the seeds for next year!) seed options.  I usually garden with gloves, and I use craft popsicle sticks for marking my plants.  I have a variety of plastic containers I use to grow my plants, and this year I'm trying a few grow bags that I got on clearance at my local hardware store.

When you go shopping, hopefully you have already researched what size containers you need depending on what type of plants you have.  You could have a combination of sizes, that might include things like this: 


5.  Create your space!  You have researched, planned, and shopped.  Now, assemble your resources according to your plan.  Do you need to start seeds inside?  Outside?  Fill containers with potting soil?  Try out your new tools?  Get out there and get in the dirt.  You can have a growing container garden like this (mine last year, early summer).


How do you start/plan your garden?  Look for more posts on how to grow in containers!

Tuesday, July 12, 2011

Broccoli Bliss!

Have you ever wondered how to take fresh from the farm broccoli and put it up for the winter?  Have you ever tasted fresh summer broccoli in the cold of late January?  Well, I'm ready to do just that!  Here's how you can put up broccoli for the winter!

STEP 1:
Make friends with your farmer!  I'm super lucky to be friends with a co-worker who helps kids grow during the school year and grows produce in the summer!  So, get your veggies from your farmer.


Box 'O Veggies from J & L Farms
STEP 2:
Cut up your broccoli.  Do you like a lot of stalk on your broccoli?  I sure don't.  So, since I'm cutting it up myself, I discard much of the stalkiness.  I love using my chef's knife for this.

Broccoli crown to yummy bite size pieces.

Pile 'O Broccoli

STEP 3:
Get ready to blanch!  I had never blanched anything until last summer.  It's really a breeze.  Get a pot to boil water in, a large bowl with ice water (lots of ice!), a strainer, and a bed of paper towels for extra draining.  Don't forget a big slotted spoon!

Boil broccoli for about 3 minutes, then immediately cool in ice water for another 3 minutes.  Drain and dry.  That's it!  Then you are ready to package and freeze.


STEP 4:
Package and freeze.  I recently bought a foodsaver, and this was my first time using it.  It was a little temperamental, but I got the hang of it quickly.  If you are using a foodsaver, be sure to prefreeze your broccoli for at least 2 hours before sealing to get out more moisture.


Enjoy your veggies in the winter!  I need more freezer space!