Thursday, March 22, 2012

Container Gardening {a series} : Starting Seeds Inside


The pride and joy of my container garden would have to be tomatoes.  Home grown tomatoes taste a bazillion times better than grocery store tomatoes.  However, tomatoes take time to grow, and if you want to grow them from seeds, like me, you have to start your seeds in winter.  Inside.

When determining what to grow, you have to be aware of how you will grow your seeds.  Sure, it would be easier to just buy starter plants at the local nursery, but the nursery may not have the type of tomato that you want.  For instance, I want open-pollinated seeds, meaning I can (try to) save seeds from my harvest to plant for the following year.  When do you start your seeds?  Where do you start your seeds?

1.  Research when to start your seeds and if they need to be started indoors or outdoors.  The best information I found was on the Almanac website.  You can plug in your zip code to the website and voila!  The site shows you the estimated last frost date and when/where to plant your seeds.  You can view my regional information here.

This year, I'm doing something new and paying attention to the Almanac "moon favorable dates."  I never paid attention to this before, but this year I thought - hey, why not.  So, if you want to plant by the moon cycle, that information is on the Almanac site as well.

2.  Make a chart of when to plant/transplant seeds/plants.

3.  Gather your indoor seed starting materials.  This might include: 
  • Seeds
  • Seed starting potting soil mix (different than regular potting soil, sterile)
  • Plant markers (I use popsicle sticks and sharpie markers)
  • Small seed starting containers (I use peat or cut up toilet paper rolls)
  • Water
  • Spoon
  • Planting trays
  • Heating mats
  • Grow lights
I do not use grow lights or heating mats.  I start seeds on top of my refrigerator where it is warmer than the rest of my house.  Once I see the seedlings pop through the dirt, I move the trays to a sunny location in my house.

4.  Assemble your seeds, dirt, water, and markers.  It is best to mix the soil with water first before putting them in your seed starting containers.  Then fill the containers with the moist dirt.  Plant seeds according to seed package instructions (I put at least 2 seeds in each space), and label.  When you are done, it might look like this:

5.  Water and sun.  Your seeds don't require sunlight until after they pop through the soil as seedlings.  So move them to a sunny space once you see them coming up.  Your plants need water, but don't drown them.  I typically water mine every other day depending on how they are doing.

Do you start seeds inside?  What are you growing?

Container Gardening {a series} : Getting Started


If you are like me, you may rent your apartment home and have a small-ish patio that is big enough to store a chair and a few pots.  Well, the past couple years I have tried my hand at container gardening with some success.

But are you wondering how to start?  Here are a few good tips to get you started.

1.  Make a plan.  How much space do you want to use for your containers?  How much sun does your space get each day?  Could there be a critter problem?  Think, think, think.  Envision how you think the containers will look on your patio - maybe even make a sketch.

2.  Decide what you are going to grow.  Not everything will grow in a container well (like corn).  Check out the book "Bountiful Container."  This book answered so many of my specific questions about planting in containers.  Also, check out the Almanac site to find planting dates and information specific to your area.  You can see my area here.  Do you want to grow herbs? Lettuces? Tomatoes? Peppers?  Root veggies?  Make your decisions and be realistic based on your needs and space.

3.  Make a plan.  Again.  Make a chart with due dates of when you need to plant and transplant seeds/plants.  I used my Orchestra app on my iPhone to create alerts to remind me.  Yes, I did.

4.  Go shopping!  After you have planned your space, decided on your produce selections and have completed a little research, I turn you loose on the wonderful world of shopping.  You list might include:
  • Potting soil
  • Compost
  • Fertilizer
  • Seeds or starter plants
  • seed starting soil
  • seed starting containers
  • Pots/containers
  • gardening tools (spade, gloves, watering can, water globes)
  • Planting markers (so you know what you plant)
Here's what I do.  I get potting soil and compost.  For some plants, I use the fertilizer Osmocote.  I try to start everything from seeds, whether they start outdoors (spinach, carrots, peas, beans) or they are started indoors (peppers, broccoli, tomatoes, squash, melons).  I get my seeds from Sustainable Seed Company because they have organic, heirloom (save the seeds for next year!) seed options.  I usually garden with gloves, and I use craft popsicle sticks for marking my plants.  I have a variety of plastic containers I use to grow my plants, and this year I'm trying a few grow bags that I got on clearance at my local hardware store.

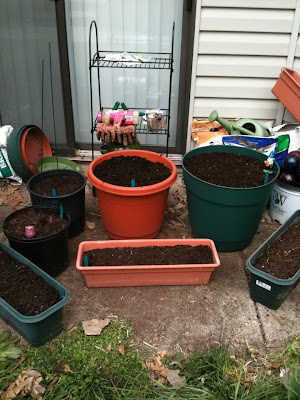
When you go shopping, hopefully you have already researched what size containers you need depending on what type of plants you have.  You could have a combination of sizes, that might include things like this: 


5.  Create your space!  You have researched, planned, and shopped.  Now, assemble your resources according to your plan.  Do you need to start seeds inside?  Outside?  Fill containers with potting soil?  Try out your new tools?  Get out there and get in the dirt.  You can have a growing container garden like this (mine last year, early summer).


How do you start/plan your garden?  Look for more posts on how to grow in containers!

100 Days of Eating at Home Challenge - Update!


Today is day 82 of the 100 Days of Eating at Home Challenge!  How are you doing?  I have found that making my meal plans more realistic assists with sticking to my meal plan most days.  I still have problems with planning ahead and taking food with me to work or if I'm going to be away from home, but I'm still improving.

I think the best news is that I am currently 31.6 pounds lighter than I was in July 2011!!  I'm still loosing slow and steady, which I am excited about.  Now, I have the "problem" of finding pants that fit me correctly.  I honestly do not have one pair of jeans that I have worn in the past couple of weeks that I thought were actually comfortable and fitting me correctly.  SAD.

I think the worst news is that I still drink commercial HFCS soda everyday.  Addicted?  Absolutely.  It seems to be less, but I guess I should be proud of myself for the times I choose water over the pepsi.  Baby steps...

Other changes:  With the rapidly increasing food prices in the country right now, I increased my food budget to $200 a month instead of $150.  I think that is more realistic, especially when I'm buying milk and eggs from a farm and possibly my chicken (saving my pennies for a spring chicken order!).

I'd love to hear how you are doing with eating at home.  18 days to go!  Will you make it?

Monday, February 6, 2012

Recipe: Spinach Artichoke Dip


Although not the healthiest appetizer in the world, definitely a tasty one!  I got this recipe from one of my friends many years ago, and it is usually a hit at parties.  The only thing that isn't too healthy is the mayo.  If you make your own mayo, it would be much better for you!

Combine:
1/2 c. sour cream
1/2 c. mayo
1/2 c. grated Parmesan cheese
1/2 c. cubed mozzarella cheese
1 pkg of chopped spinach (thawed and squeezed of liquid)
1 can artichoke hearts, chopped
1-2 tsp. minced garlic

Mix everything together and put in a 8x8in glass baking dish.  Bake in 350 degree oven for 15-20 minutes or until everything is melty goodness.  Serve with corn chips (I use Target brand organic blue corn chips).

Sunday, February 5, 2012

Meal Planning: Week of 2-5-2012

What are you eating this week?

Saturday, February 4, 2012

BRRRR!


Since I have been meal planning more and consistently, I decided it may be helpful to do a total and accurate inventory of my freezers.  This is something I have been avoiding for a long time.  I sort of knew what was lurking in the depths of my deep freeze, but I wasn't sure...exactly.

So, today I took everything out of my deep freezer and my fridge freezer and created an inventory.  I found some great stuff that I had forgotten was in there, and I could probably eat for months without going to the store.  Yippee! 

Even more exciting is the fact that I was able to organize the freezers a little better.  All of the meat is in the deep freeze while all of the cheese is now in the fridge freezer.  It's the little things, folks.

Here is a glimpse into my spread sheet awesomeness that is my new freezer inventory...


In the future, I hope to take an inventory of the rest of my pantry, also, so I can just do my meal planning from real time inventory lists.  This is, of course, a pie in the sky wishful dream. :)

Do you know what is lurking in your freezer?  Do you have a good way to keep inventory?

Wednesday, February 1, 2012

Crunchy?

So, I'm not a mama.  Nor have a really classified myself as "crunchy."  Yet, I understood every single reference in this video.  Enjoy!