Saturday, September 22, 2012

The Foodie Wagon


For a while now, I've been working on eating more at home, eating more real food, eating more traditional foods, and trying to (*trying*) cut out sugars.  Well, this summer and with the beginning of the work year in August paired with working a part time job, I've slacked and fallen back on my healthy journey.  After gaining a few pounds in the past month and a half paired with an increase in headaches and caffeine dependence, I'm trying desperately to get back on the food wagon.

With so many opinions out there about diet and what to eat (and what NOT to eat), sometimes I feel like I'm barely treading water in an ocean of conflicting information.

Right now, I'm working on the caffeine addiction because I think it is the most concerning.  Oh, this week the headaches, sweats, and fatigue have been horrible!  However, today I feel better and my sleeping, heart rate, anxiety, and overall "up-tight-ness" seem so much better.  Still a little fatigued, but I'm sure I'll get used to that.

The next step, not as easy.  I'd love to try going a little more primal/paleo for a while to see how it effects me, but let's get practical.  I have a LOT of grains in the house that need to be eaten.  Oatmeal, pasta, rice...as someone who is a closet prepper I have things stashed away that should really be eaten in the house.  So what is a girl to do who is thinking about going grain-free?  

Here's what I'm thinking...moderation.  A lot of real food websites I visit employ the 80-20 rule.  80% of the time I'm going to try super hard to have the healthiest organic, non-GMO, real food, paleo, primal, grain-free whatever I'm trying.  The other 20% is up for grabs.  That boils down to 1 out of 5 meal planning days can be off a little.  I'm not exactly saying that 20% will be McDonald's fries, Coca-cola and cheetos, but if I plan a meal with pasta that I have in my house I should just let it be.  Or, if my boyfriend wants to take me out for ice cream, I'm not going to throw a hissy fit.  I'm going to enjoy it.

How do you reconcile eating off your plan at times?  What do you do when you fall off the foodie wagon?

Wednesday, September 19, 2012

{Recipe} Homemade Chicken Stock

Mom's Turkey Soup
I grew up eating homemade stock only in the winter and during Thanksgiving/Christmas season.  Every year, my Mom would make a turkey and create the most lovely turkey stock which was turned into turkey soup.  For her, this included the "innards", bones, meat still on the carcass, celery, carrots, salt, pepper, and LOVE.

The smell of the turkey stock cooking would permeate the house while cooking for at least a whole day.

She would then strain the broth, then pick the turkey from the bones (not a funtastic task at all!).  The Broth and meat was then portioned together and frozen for use throughout the winter.  YUM.

I have longed to do the same at my own home, and I have tried to do this for over a year without getting that perfect stocky flavor using chicken.

Mistakes I made:
*using onion (end result was onion soup)
*using carrots (bitter tasting)
*using too many spices (not good tasting)
*not cooking it long enough (not a good chickeny stocky flavor)

This week my house finally smelled similar to my Mom's house the day after Thanksgiving when the turkey stock was cooking all day.  Hooray!

Here's what I did...

First, I cooked a small whole chicken in the crockpot.  I seasoned it with garlic salt, pepper, and paprika.

Then, I picked the chicken.  You know, taking the meat off the bones after it is finished cooking.  I really dislike this part...but it is worth it!  Since I want to make soup from this, I left a good amount of meat on the bones to cook with the stock (mainly the dark meat, which is awesome for soup!).

Next, I put all the trimmings back into the crockpot.  This included everything...bones, meat, skin.  I filled the crockpot with cold, filtered water and let it sit for 30 minutes before starting it up on low.

I didn't add any veggies or any extras this time.  I figured I could season it later if it was a little bland.  And, oh am I so glad I didn't season it!  It smells amazing, and I finally achieved that sort of golden color with stock!  Yay!

Then, I cooked the heck out of it!

 I let the first batch cook for at least 12 hours on low in the crockpot.  I actually cooked two whole chickens this time and put all the trimmings together in the crockpot.  I got 3 batches of stock out of this which yielded about 3 gallons.

When it has the color taste you are looking for, strain the trimmings from the stock using a mesh strainer.  I put the stock in gallon sized canning jars.  Let it sit on the counter to cool before putting in the fridge.

2nd batch of broth, a little lighter than the first but still pretty!

After it has cooled in the fridge for a while, the fat will harden and rise to the top.  Skim this part off before storing or using.  Although, I might keep the fat separately this time and use it in other cooking...we'll see...

And the trimmings?  Well, my least favorite part is picking the trimmings.  My Mom always had 3 bowls for sorting:  one with the trimmings, one to keep, one to pitch.  This can be super tedious, but so worth it in the end!

Portion, freeze, and soup's on!

Thursday, July 26, 2012

Raw Garlic


I have been wanting to use more natural medicinal remedies for a while now.  However, I have been a little too chicken to do so!  I mean, who really wants to eat raw garlic?  There is the big ICK factor with actually consuming raw garlic.  Plus, the bad garlic breath.  PLUS, the bad garlic body odor...

But today, I ate a raw clove of garlic.  OH, yes I did!

TMI ALERT.

I've been a little sluggish this whole week, having a bit of a "lady parts" problem, and I had a sore throat this morning.  So, I told myself I was going to try the garlic thing.

First, I did a little more research. 

Here's what Dr. Mercola says about garlic.

Here's what one of my favorite blogs says about natural antibiotics. 

I did also take a vitamin supplement that I take when I'm feeling down today, my fish oil with Vitamin D, and a little ibuprofen because my throat was bothering me.

I plan on updating this after more consumption, but here is what I have experienced so far:
*Eating the crushed garlic was less than pleasant.  I held my nose and chewed it. 
*My mouth was on FIRE.
*I felt like I was going to vomit.
*I had to drink a load of water immediately after.
*I chose to eat right before I took the garlic, which I think was a good idea considering the nauseated feeling.
*I also ate a piece of bread after I took the garlic because, well, yeah.  Refer to mouth on fire.
*It is now about an hour and a half after taking the garlic, and I am sweating.  I hope that is just a detox reaction.

Why is garlic so awesome?

As I read on one website, it is a quadruple treat:  it's antibacterial, antiviral, anti-fungal, AND anti-vampire!

It's probably the best way to treat sickness, and getting antibiotics from the doctor should be a last resort only.  Your body won't build up a resistance to garlic like it does antibiotics.  Just do your research, know the side effects, and make your own personal and family decisions.

This post is part of Try It Out Tuesday!


Wednesday, July 18, 2012

{Recipe} Super Garlic Chicken Drumsticks in the Crockpot

This post is part of Try it Out Tuesday!

It is so HOT in St. Louis right now, it is difficult for me to choose my meal plan because I really don't want to use the oven or stove.

Enter crockpot.

Chicken drumsticks were on sale at the store this week, so I was looking for a great crockpot chicken recipe.

I found a garlic chicken drumstick recipe.  I heart garlic!  You can see my pin here in my recipe board.

First, I went shopping!


Since this recipe called for mega garlic, I treated myself to prepared garlic to save some time.  I love this package from Trader Joe's.


I put the chicken stock in the crockpot and turned it on low.  I used a whole can of broth so I could make gravy from the stock after cooking.

I layered the drumsticks in and sprinkled with spices and garlic.  I did not measure the spices.


Then, I made a second layer of chicken.  In order to cook all the drumsticks, I had to make two layers (10 drumsticks).


That was it!  I just waited for it to cook for about 5 hours on low (my crockpot has a strong low setting).  My house smelled heavenly!  When it was done, I plated with some zucchini and enjoyed!


It turned out great!  Next time, I would take the skin off the chicken before cooking, but otherwise I loved it.  Just adjust the spices to what you like.

Tuesday, July 17, 2012

{Recipe} Parmesan Zucchini

Zucchini is one of my favorite veggies.  This recipe is something my family always made for fresh zucchini from the garden.  I made a few changes, but it is still delicious!

 In my fridge, I had half of a ginormous zucchini that my family gave me about a week ago from the garden.  It needed to be cooked, so today was the day!

First, I chopped up this bad boy while I melted a little pastured butter in a small skillet.


Next, I added the chopped zucchini to the skillet to cook.  I seasoned it with some pepper and Lawry's seasoned salt.

I let the zucchini cook until the consistency I like best - soft, but not mushy.  It took a while to cook down because I used my smallest pan.


When it was finished, I plated the zucchini and grated parmesan cheese on top.  The cheese helps to give it just a little zing-a-ling!


This post is part of Try It Out Tuesday!


Sunday, June 10, 2012

Leftovers for Breakfast


I wholeheartedly intended to take a picture of my breakfast this morning, but I ate it a little too quickly!  YUM!

Last night, I made grilled grass-fed hamburgers (no buns) topped with homemade/home canned sweet pickle relish.  For my "fries" I took red and yellow bell peppers cut in to steak fry sizes and lightly grilled them.  It was really good, but there was no way I could eat all the peppers.

So, this morning, I wanted to use up some of those delicious peppers.  So, I diced them, threw them in the pan with 2 pastured eggs from the farm, some grass fed butter, and topped with a little sharp cheddar cheese.

Now do you understand why I didn't get a photo?  It was so good!  You can also do this with many veggies...onions, potatoes, zucchini, tomatoes.  They all go well with the eggs.

What leftovers do you use for breakfast?


Thursday, March 22, 2012

Container Gardening {a series} : Starting Seeds Outside


We've discussed getting started with container gardening and starting seeds inside.  What about those cool weather crops that you can sow directly outside?  You know, peas, spinach, carrots, etc...

1.  Make a plan.  Research and make sure you know when you are supposed to be planting seeds outside.  Reference the seed package and the Almanac website, which I referenced in previous posts.  How many seeds are you going to put per container?  Is each container big enough for the seeds you are planting?  I have found, for instance, my tomatoes do so much better with larger pots, one plant per container.

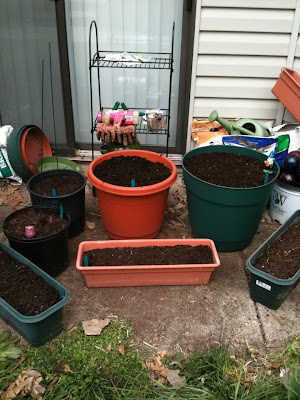
2.  Prepare your soil.  For me, I have pots left over from last year.  Most of them are still full of soil, and some are still full of dead plant parts.  I made sure I till and mix the soil completely in each pot, often removing any large leaves or plant parts.  This year, I mixed in some Cotton Burr compost for extra nutrients.  Maybe you are filling new pots.  Make sure you have chosen good potting soil and fill your pots.  A little compost on top can also be helpful.

3.  Plant your seeds.  When your soil is ready, gather your seeds.  Follow the directions on the seed package for soil depth and how far apart to plant seeds.  I know it is hard for me to sometimes only put one seed or plant per pot, but it is worth it.  When the plants have more space, they will produce better.

4.  Water your planted seeds.  Make sure to give your seeds a good drink to help them settle in their new home.

5.  Label and watch them grow!  I am (for the first time) labeling all my pots with what is growing in them.  I have several different varieties of peppers and tomatoes, and I need to know if I am picking a green pepper or a chocolate pepper.

What are you planting for cool weather crops this year?  I already have snow peas (above), carrots, spinach, clover, wildflowers, and broccoli growing outside.

Container Gardening {a series} : Starting Seeds Inside


The pride and joy of my container garden would have to be tomatoes.  Home grown tomatoes taste a bazillion times better than grocery store tomatoes.  However, tomatoes take time to grow, and if you want to grow them from seeds, like me, you have to start your seeds in winter.  Inside.

When determining what to grow, you have to be aware of how you will grow your seeds.  Sure, it would be easier to just buy starter plants at the local nursery, but the nursery may not have the type of tomato that you want.  For instance, I want open-pollinated seeds, meaning I can (try to) save seeds from my harvest to plant for the following year.  When do you start your seeds?  Where do you start your seeds?

1.  Research when to start your seeds and if they need to be started indoors or outdoors.  The best information I found was on the Almanac website.  You can plug in your zip code to the website and voila!  The site shows you the estimated last frost date and when/where to plant your seeds.  You can view my regional information here.

This year, I'm doing something new and paying attention to the Almanac "moon favorable dates."  I never paid attention to this before, but this year I thought - hey, why not.  So, if you want to plant by the moon cycle, that information is on the Almanac site as well.

2.  Make a chart of when to plant/transplant seeds/plants.

3.  Gather your indoor seed starting materials.  This might include: 
  • Seeds
  • Seed starting potting soil mix (different than regular potting soil, sterile)
  • Plant markers (I use popsicle sticks and sharpie markers)
  • Small seed starting containers (I use peat or cut up toilet paper rolls)
  • Water
  • Spoon
  • Planting trays
  • Heating mats
  • Grow lights
I do not use grow lights or heating mats.  I start seeds on top of my refrigerator where it is warmer than the rest of my house.  Once I see the seedlings pop through the dirt, I move the trays to a sunny location in my house.

4.  Assemble your seeds, dirt, water, and markers.  It is best to mix the soil with water first before putting them in your seed starting containers.  Then fill the containers with the moist dirt.  Plant seeds according to seed package instructions (I put at least 2 seeds in each space), and label.  When you are done, it might look like this:

5.  Water and sun.  Your seeds don't require sunlight until after they pop through the soil as seedlings.  So move them to a sunny space once you see them coming up.  Your plants need water, but don't drown them.  I typically water mine every other day depending on how they are doing.

Do you start seeds inside?  What are you growing?

Container Gardening {a series} : Getting Started


If you are like me, you may rent your apartment home and have a small-ish patio that is big enough to store a chair and a few pots.  Well, the past couple years I have tried my hand at container gardening with some success.

But are you wondering how to start?  Here are a few good tips to get you started.

1.  Make a plan.  How much space do you want to use for your containers?  How much sun does your space get each day?  Could there be a critter problem?  Think, think, think.  Envision how you think the containers will look on your patio - maybe even make a sketch.

2.  Decide what you are going to grow.  Not everything will grow in a container well (like corn).  Check out the book "Bountiful Container."  This book answered so many of my specific questions about planting in containers.  Also, check out the Almanac site to find planting dates and information specific to your area.  You can see my area here.  Do you want to grow herbs? Lettuces? Tomatoes? Peppers?  Root veggies?  Make your decisions and be realistic based on your needs and space.

3.  Make a plan.  Again.  Make a chart with due dates of when you need to plant and transplant seeds/plants.  I used my Orchestra app on my iPhone to create alerts to remind me.  Yes, I did.

4.  Go shopping!  After you have planned your space, decided on your produce selections and have completed a little research, I turn you loose on the wonderful world of shopping.  You list might include:
  • Potting soil
  • Compost
  • Fertilizer
  • Seeds or starter plants
  • seed starting soil
  • seed starting containers
  • Pots/containers
  • gardening tools (spade, gloves, watering can, water globes)
  • Planting markers (so you know what you plant)
Here's what I do.  I get potting soil and compost.  For some plants, I use the fertilizer Osmocote.  I try to start everything from seeds, whether they start outdoors (spinach, carrots, peas, beans) or they are started indoors (peppers, broccoli, tomatoes, squash, melons).  I get my seeds from Sustainable Seed Company because they have organic, heirloom (save the seeds for next year!) seed options.  I usually garden with gloves, and I use craft popsicle sticks for marking my plants.  I have a variety of plastic containers I use to grow my plants, and this year I'm trying a few grow bags that I got on clearance at my local hardware store.

When you go shopping, hopefully you have already researched what size containers you need depending on what type of plants you have.  You could have a combination of sizes, that might include things like this: 


5.  Create your space!  You have researched, planned, and shopped.  Now, assemble your resources according to your plan.  Do you need to start seeds inside?  Outside?  Fill containers with potting soil?  Try out your new tools?  Get out there and get in the dirt.  You can have a growing container garden like this (mine last year, early summer).


How do you start/plan your garden?  Look for more posts on how to grow in containers!

100 Days of Eating at Home Challenge - Update!


Today is day 82 of the 100 Days of Eating at Home Challenge!  How are you doing?  I have found that making my meal plans more realistic assists with sticking to my meal plan most days.  I still have problems with planning ahead and taking food with me to work or if I'm going to be away from home, but I'm still improving.

I think the best news is that I am currently 31.6 pounds lighter than I was in July 2011!!  I'm still loosing slow and steady, which I am excited about.  Now, I have the "problem" of finding pants that fit me correctly.  I honestly do not have one pair of jeans that I have worn in the past couple of weeks that I thought were actually comfortable and fitting me correctly.  SAD.

I think the worst news is that I still drink commercial HFCS soda everyday.  Addicted?  Absolutely.  It seems to be less, but I guess I should be proud of myself for the times I choose water over the pepsi.  Baby steps...

Other changes:  With the rapidly increasing food prices in the country right now, I increased my food budget to $200 a month instead of $150.  I think that is more realistic, especially when I'm buying milk and eggs from a farm and possibly my chicken (saving my pennies for a spring chicken order!).

I'd love to hear how you are doing with eating at home.  18 days to go!  Will you make it?

Monday, February 6, 2012

Recipe: Spinach Artichoke Dip


Although not the healthiest appetizer in the world, definitely a tasty one!  I got this recipe from one of my friends many years ago, and it is usually a hit at parties.  The only thing that isn't too healthy is the mayo.  If you make your own mayo, it would be much better for you!

Combine:
1/2 c. sour cream
1/2 c. mayo
1/2 c. grated Parmesan cheese
1/2 c. cubed mozzarella cheese
1 pkg of chopped spinach (thawed and squeezed of liquid)
1 can artichoke hearts, chopped
1-2 tsp. minced garlic

Mix everything together and put in a 8x8in glass baking dish.  Bake in 350 degree oven for 15-20 minutes or until everything is melty goodness.  Serve with corn chips (I use Target brand organic blue corn chips).

Sunday, February 5, 2012

Meal Planning: Week of 2-5-2012

What are you eating this week?

Saturday, February 4, 2012

BRRRR!


Since I have been meal planning more and consistently, I decided it may be helpful to do a total and accurate inventory of my freezers.  This is something I have been avoiding for a long time.  I sort of knew what was lurking in the depths of my deep freeze, but I wasn't sure...exactly.

So, today I took everything out of my deep freezer and my fridge freezer and created an inventory.  I found some great stuff that I had forgotten was in there, and I could probably eat for months without going to the store.  Yippee! 

Even more exciting is the fact that I was able to organize the freezers a little better.  All of the meat is in the deep freeze while all of the cheese is now in the fridge freezer.  It's the little things, folks.

Here is a glimpse into my spread sheet awesomeness that is my new freezer inventory...


In the future, I hope to take an inventory of the rest of my pantry, also, so I can just do my meal planning from real time inventory lists.  This is, of course, a pie in the sky wishful dream. :)

Do you know what is lurking in your freezer?  Do you have a good way to keep inventory?

Wednesday, February 1, 2012

Crunchy?

So, I'm not a mama.  Nor have a really classified myself as "crunchy."  Yet, I understood every single reference in this video.  Enjoy!

Tuesday, January 31, 2012

Recipe: Easy Grilled Chicken Salad


I often like to just throw a salad together for dinner.  It is something easy and extremely satisfying.
1.  Grill 1 chicken breast
2.  Gather your greens (I like organic baby lettuces).
3.  1 tomato (with salt and pepper)
4.  Cheese (I like to mix Parmesan and whatever else is in the fridge)
5.  Bacon, sometimes, if already cooked and in pieces.
6.  Egg, sometimes, if already hard boiled and in the fridge.
7.  Dressing:  Something light, I usually choose Ken's Steakhouse Northern Italian with Basil & Romano.
8.  Toss and enjoy!


What kind of salad can you make in a pinch?

Monday, January 30, 2012

100 Days of Eating at Home: Day 30 Update


Eating ALL my meals at home or making them at home has proven more difficult than I originally predicted!  So, I started sort of slow.  The first week, I tried to eat 2 out of 3 meals at home, and I've been scaling down from there.  So far, it's going well this week.  I did forget my lunch at home today (doh!), so I went to Crazy Bowls and Wraps for a chicken-veggie-rice wrap for lunch.

I think I have learned that meal planning and taking the time to prep food for my work week on the weekend to be the most important things.  I am trying to make myself stick to the plan instead of making an impulsive, emotional choice of food during the day.  This is getting better!  I am finding it comforting that I have already decided what I will eat each day, and it's lowering my stress a little bit. :)

I also just weighed myself last week.  Honestly, I hadn't weighed myself since mid-July last year!  So, I was surprised to see I had lost 20 pounds!  And, since then, I have lost 6 more pounds!  Am I exercising regularly?  Uh, no.  So I'm going to just continue what I'm doing until I plateau, then add more exercise into the routine.  I have a goal to lose a total of 50 pounds by the 1 year mark in July.  It's an ambitious goal, but I'm sure I can do it if I try!

How is your meal planning and eating at home going?  What is the hardest part?

Meal Planning: Week of 1-28-2012

Monday, January 2, 2012

Day 2 - Eating at Home Challenge


I'm off work again today, so eating at home should be a breeze, right?  Maybe, maybe not.  I have this urge to run out and get a soda, which is a whole other topic revolving around a sugar addiction.

Breakfast was a success, and I stuck to the meal plan!  Amazing, I know.  I ate 2 pastured eggs with cheese and orange juice.  I even took my vitamins.

Did you know that I visited a new farm this weekend?  The farm I used to buy pork, beef, chicken, milk, cheese and eggs from recently closed to the public.  Since then, I've been researching places to buy from locally.  The farm that seemed the most similar is a bit of a hike.


Yet, the drive was pretty easy.  And, if you know me, you know I love a great drive through the country.  While at the farm, I picked up some eggs, real milk, and raw milk grass-fed cheddar cheese.  But, I think I was the most excited to pet the calves!  I really miss my grandparent's farm that I frequented growing up.

I'm hoping this milk lives up to my expectations.  I always get a little bit nervous getting food items from a new farm.  But, I should trust the reviews and information I have researched.  Off to have a glass of milk!

Day 1 - Eating at Home Challenge


New Year's Day 2012 is the day I chose to begin my 100 days of eating at home challenge!  I spent the night on New Year's Eve at my parent's house, and I consider eating at home to include my parent's house.  Plus, free food for me!
Did I eat real food at my parent's house?  Uh, no.  But, I woke up having some bread and butter and cinnamon rolls.  I came home and took a nap and accidentally skipped lunch completely.  That's pretty frugal!  I looked in my fridge for dinner, and I found half a jar of tomato sauce and decided I better use it up before it went bad.  I cooked up some bow tie pasta along with the tomato sauce and cheese for a very frugal, left-over using dinner.

This was not what I meal planned for today, but I still ate at home!  At this point, I see this as success.

What did you eat at home today?  Did you stick to your meal plan?

Sunday, January 1, 2012

100 Days of Eating at Home Challenge


As a single woman living alone, I find that it is really easy to fall into the habit of eating out - frequently.  I have fallen into this bad habit, and it's time to change this.  I think part of it was a time management issue with being a full time graduate student for the past three years, but since graduation I've had more time to be domestic.
Maybe it's because I need to consider my budget more closely.  Maybe it's because my fridge-freezer AND my deep freezer are stuffed so full I cannot get anything else in there (I'll have to take a picture...).  But I need to eat what is in the house and not run out to get something at my first inkling of a hungry rumbly tummy.

Here are the RULES:

1.  Every meal should be based on making it in my house.  I know I won't always be "eating" at home (hello, work), but the food should come from my own kitchen and not Fazoli's.

2.  I will be allowed to purchase beverages when out.  Let's face it, I like to drive through McDonald's to get an unsweetened ice tea.  Beverages outside the home are legal in order for me to keep my sanity.

3.  If someone invites me to a meal out, that is legal if I can afford it.  If I am not paying for the food, then I think that's okay. 

4.  I am going to start out with a $150 per month food budget.  This is harsh!  However, I need to use the meat, veggies, and stuff in my freezer.  If I eat down some of the stash at my home, I should be okay.

5.  I will need to meal plan and try to stick to it.  The sticking-to-it is the hard part.  I can meal plan until the cows come home, but actually eating what it says to eat is and inner struggle.

6.  Buying seeds and trying my hand at my container garden again this year will not be part of the food budget.

7.  For the most part, I will attempt to continue adding in "real food" for my ongoing transition to real food.  This is going to be difficult on the budget, but hopefully I will still be able to afford milk and eggs from the farm.

How often do you eat at home?  Is it a challenge to resist eating out?

Potato Soup


Around Thanksgiving, I bought a giant bag of potatoes on sale for $1.99.  I just realized they are still sitting on my pantry floor, and haven't (amazingly) sprouted yet.  I need to make some delicious winter potato soup!

STEP 1:
Wash, peel, and cut potatoes.  The smaller you cut them, the faster they will cook.

STEP 2:
Bring a large pot of water to a boil, add potatoes, and boil until tender.

STEP 3:
Drain potatoes, and return potatoes to pot.

STEP 4:
Mash potatoes.  I usually hand mash, but I did purchase a new stick blender that I may try.

STEP 5:
Add butter, milk, salt, pepper, and parsley to taste.  This is just like making mashed potatoes, but add milk until desired consistency is achieved.  I just went to the farm and purchased some REAL MILK, so that will make this soup extra nourishing!

STEP 6:
Heat soup to desired temperature for serving.  Enjoy!


I also usually serve this with smoked sausage with a little melted cheese on top.  I do this because it's what my Mom did when I was growing up.  Use grass-fed cheese to up the nutrient value for this meal.